File management best practices for designers
By: Brent Morrison
December 10, 2020 | Reading Time: 6 mins
Let’s face it, file management isn’t sexy. I’ll get to it later, we lie to ourselves. By the end of a project, your pile of design files has grown into a hot dumpster fire. But taking the time to organize your folder structure at the beginning of a project can increase productivity and help you keep your sanity when deadlines get tight.
So how should you approach your folder structure? What should you avoid? Let’s get started.
Why File Management is Important
Imagine this scenario. A client has requested a change to an older project and needs it ASAP. You locate the project folder only to find a mess of files and missing links with multiple versions labelled “final”. If it’s final, why are there ten of them?

Sound familiar? Better file management and organization leads to greater efficiency. In addition to keeping your head on straight, you will:
- Become a more productive designer
- Look more professional
- Feel less stressed
- Be your team’s favourite designer
You’ll Become a More Productive Designer
Opening an old project only to discover missing links, fonts, and files can really disrupt your workflow. It’s not only frustrating for you and collaborating designers, but you lose time that otherwise would be spent on client work. Fewer scavenger hunts means increased productivity.
You’ll Look More Professional
Think about that person walking into a job interview with messy hair and a wrinkly shirt. Now imagine someone that’s well dressed, clean-cut, and put together. It’s obvious which one looks more competent and professional. Your file management is no different. If your file and folder structure looks like a virtual hurricane blew through, you’re communicating to others that you’re unorganized, lazy, and likely overwhelmed.
You’ll Feel Less Stressed
Think about your files and folders like your house. When it’s upside down and disorderly, it impacts your mood. You get stressed not knowing where things are, making more of a mess just to find what you’re looking for. When it’s tidy, you can relax knowing things are organized.
Your Team Will Love You
What happens when a client requests changes to a file but you’re out on vacation? If you work with an agency, team members will need access to your work at some point. So again, thinking of your file structure as a house — you want it to be clean for when friends and family show up unannounced. Having a well-managed file system will make it effortless for team members to find the right file so they can get in and out like a ninja.
The Stryve System
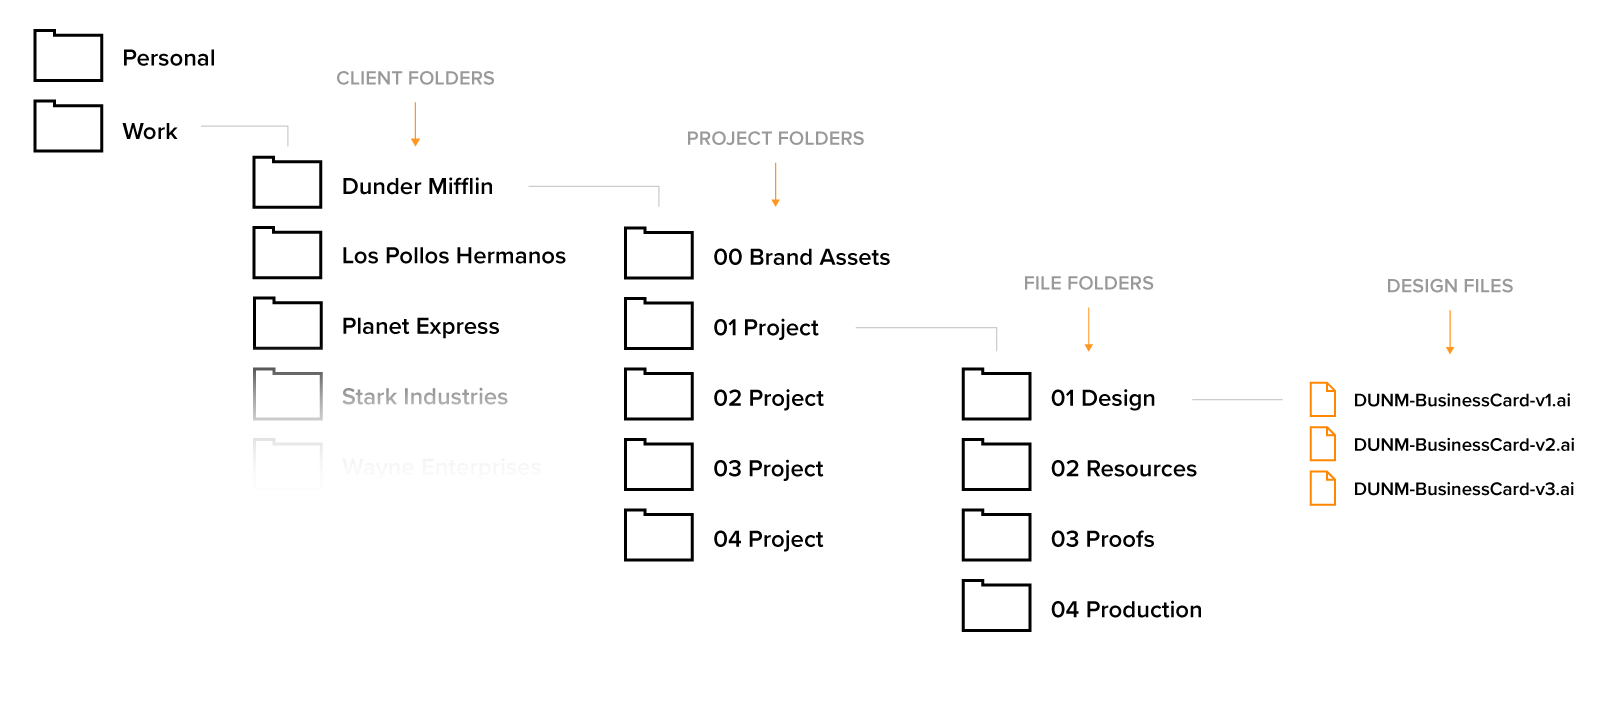
Generally, this is how I break down my folders. Not every client will be the same so they may have different subfolders based on projects. With organization being the goal, you don’t want to create so many folders that it takes forever to click through them. At the same time, you want to avoid having a pile of files in a single area. Treat this as a solid foundation to work from and then mould it to what works best for you.
- Work Folder
- Client Folders
- Project Folders
- File Folders
Work Folder and Client Folders
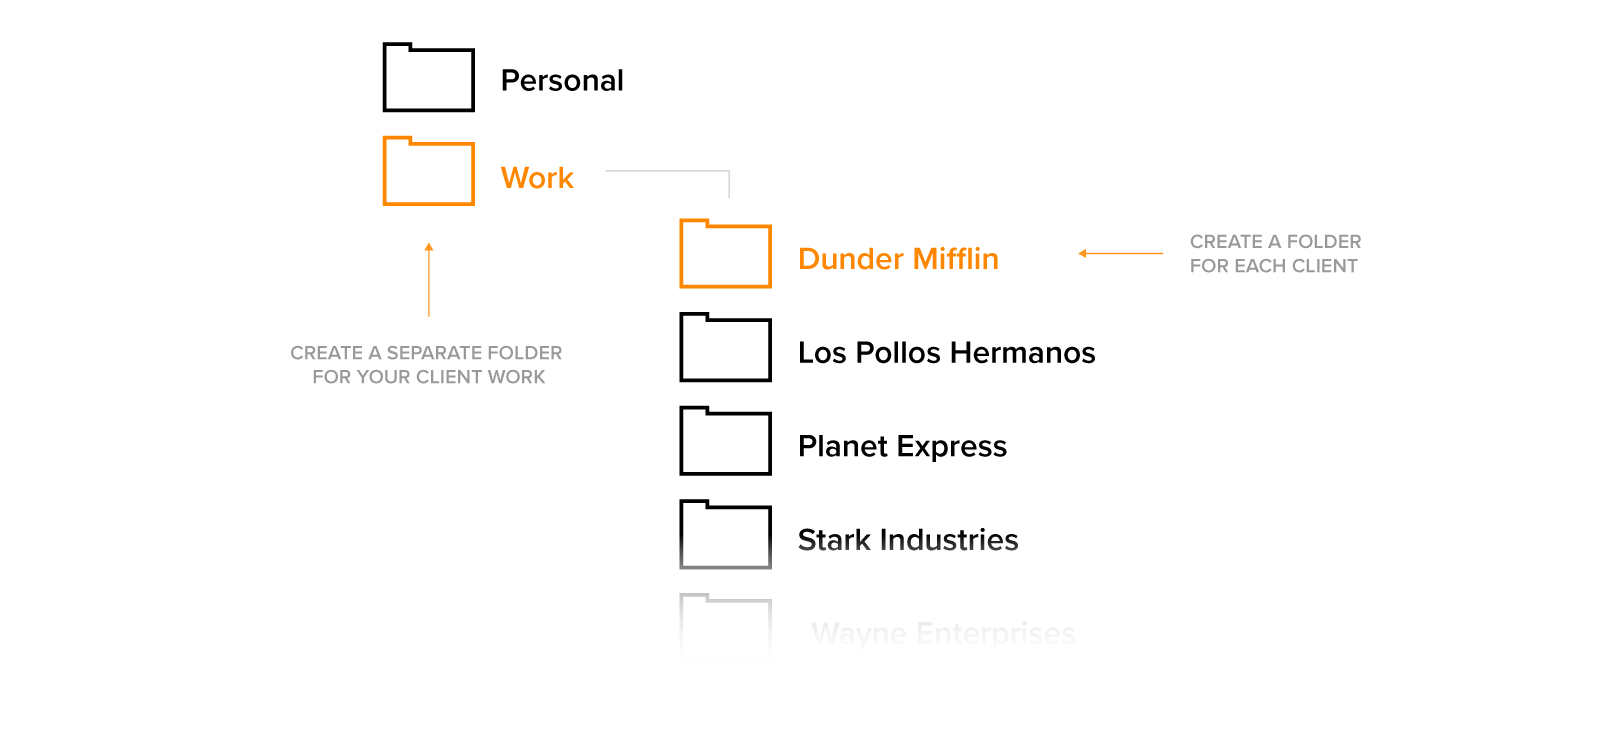
First, create a Work Folder to separate your work files from your personal files. Inside your work folder will be Client Folders. Whether you’re working for an agency or doing freelance, you’ll have multiple clients so it’s important to have dedicated folders for each as seen below.
 Project Folder
Next, you’ll want to create Project Folders within each Client Folder. I recommend starting with numeric labels so projects are in order of when they were created (ie. 01 Project, 02 Project, 03 Project). When it comes to similar project types, you’ll want to be descriptive with your folder naming. “Facebook Ad” is good, but “Dundi Awards Facebook Ad” is better.
Taking this one step further, try creating a project folder dedicated to similar project types. If a client has multiple social campaigns they’ll add up to a lot of project folders over time. By grouping similar project types together, your folders will be tidier and easier to navigate.
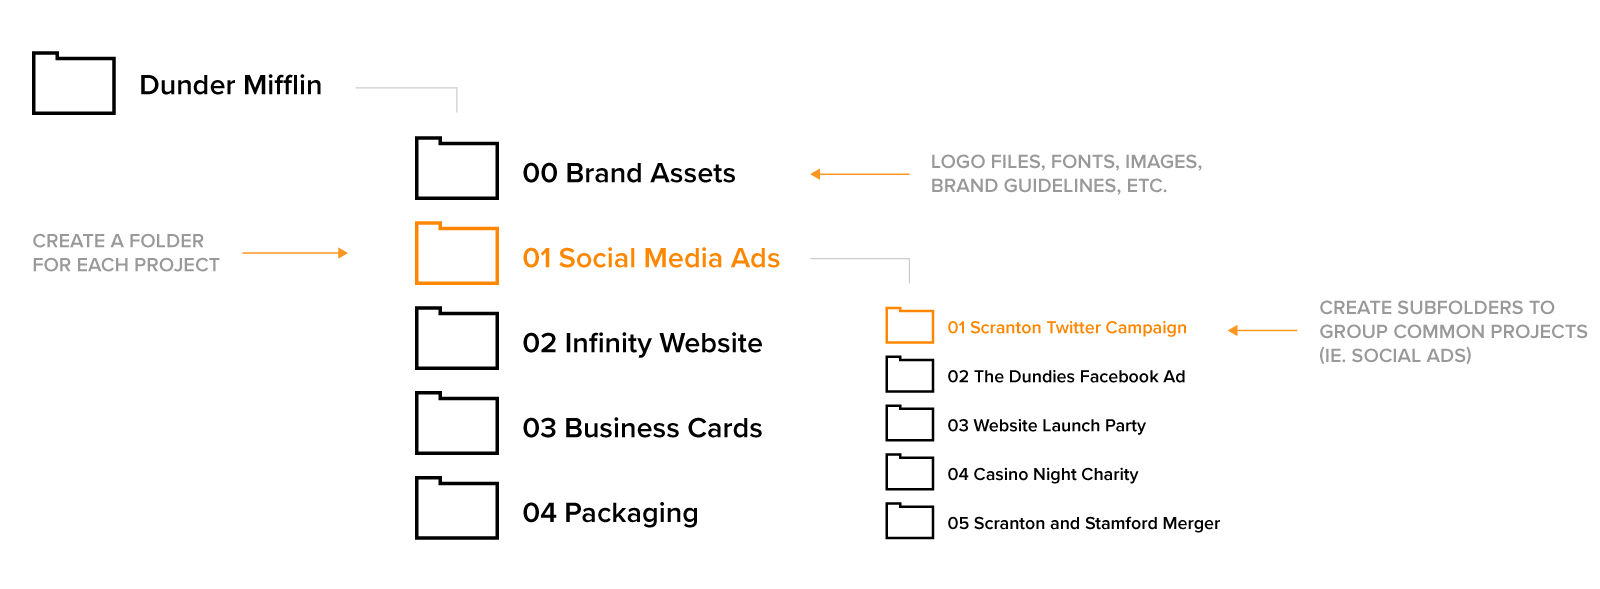 In each Project Folder, you’ll have a subfolder called Brand Assets. This is where you’ll keep files associated with the client’s brand. This includes logo files, photos, brand guidelines, etc. Label this folder with “00” at the beginning so it’s always at the top of your client folder for easy and quick access.
File Folders
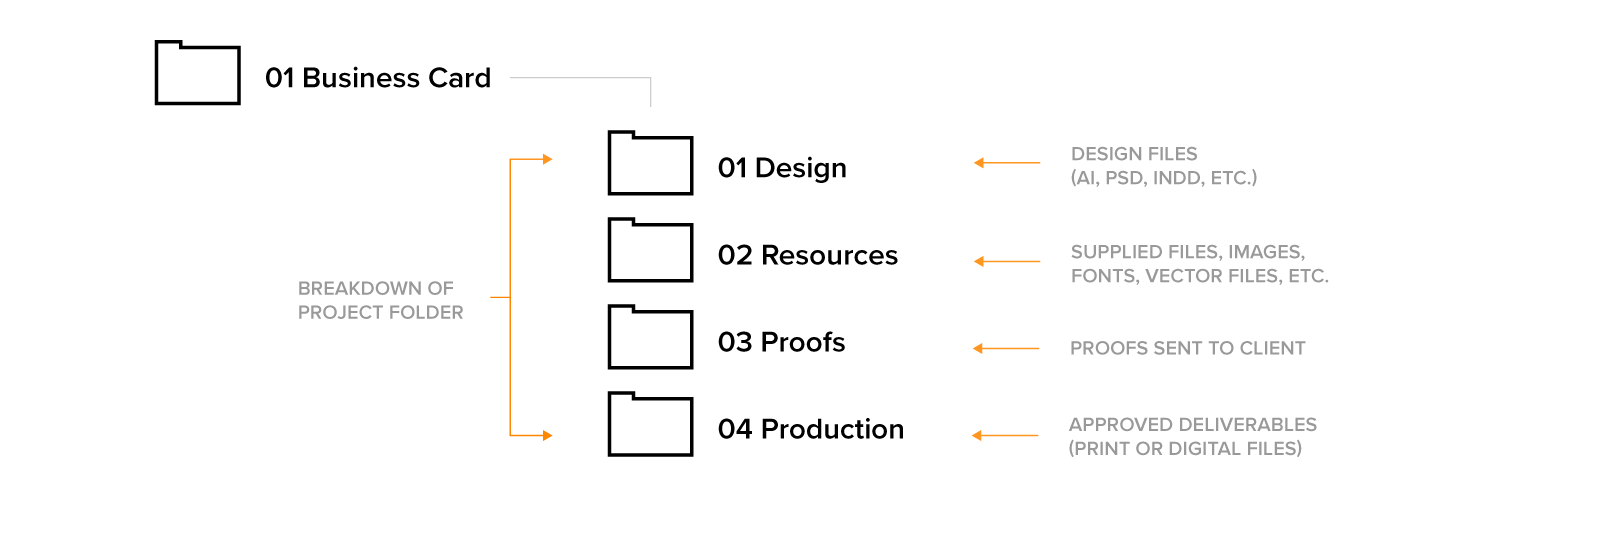
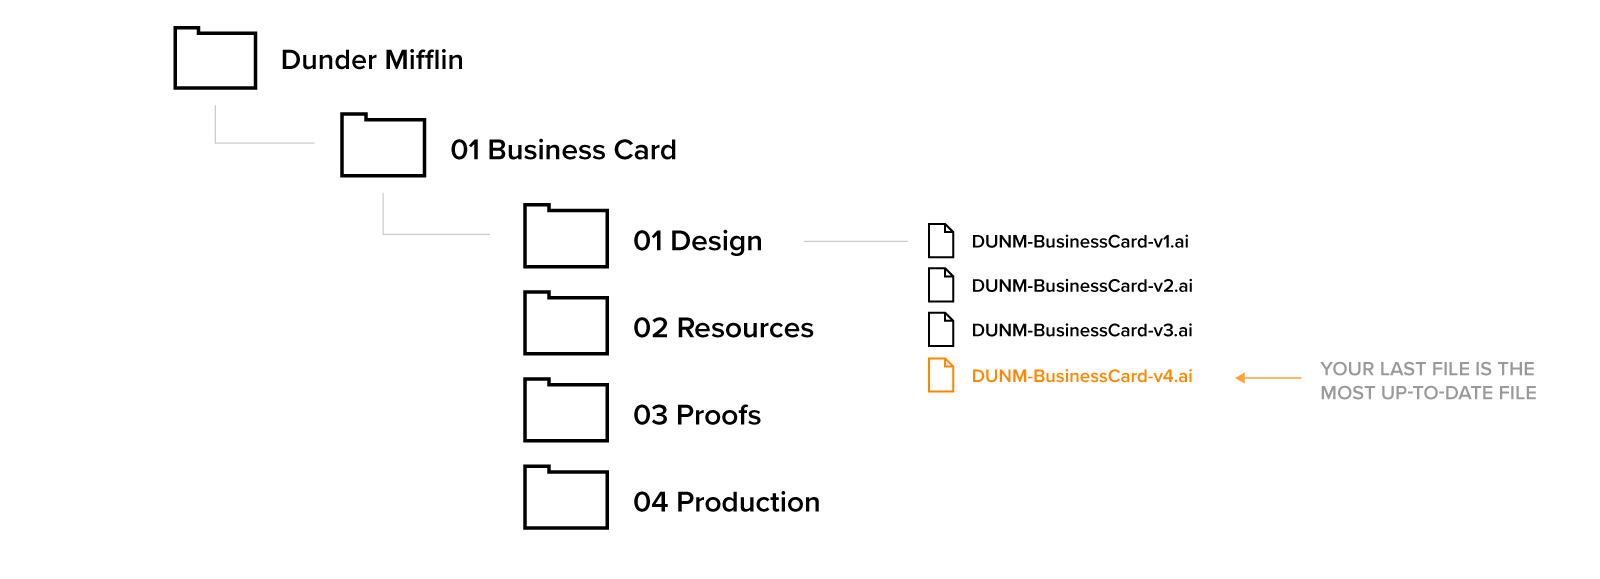
This is where we drill down into the specifics of a Project Folder, which will help keep your individual projects organized while designing them. Here’s the breakdown:
Design: Place all your design files here (Illustrator, Photoshop, Indesign etc.).
Resources: This is where your images, vectors, fonts, and other design elements will go.
Proofs: All of your client’s proofs will be placed here including any feedback they may provide back to you.
Production: This is where all your approved deliverables will be placed. It’s recommended that you package your deliverables so the final project is contained in one area with all of the necessary files.
Naming Files and Saving Revisions
Now that you’ve got a sense of order with your folders, the next important thing is how you save your files.
Whenever I create a new file I always begin with the initials or short form of the client I’m working on. This gives your design file easy identification if you’re doing a search or deciphering between two files with the same name. In this case, I’ve used the letters “DUNM” for Dunder Mifflin. You can check out my blog on Creating a logo package for your client to see additional examples on file naming.
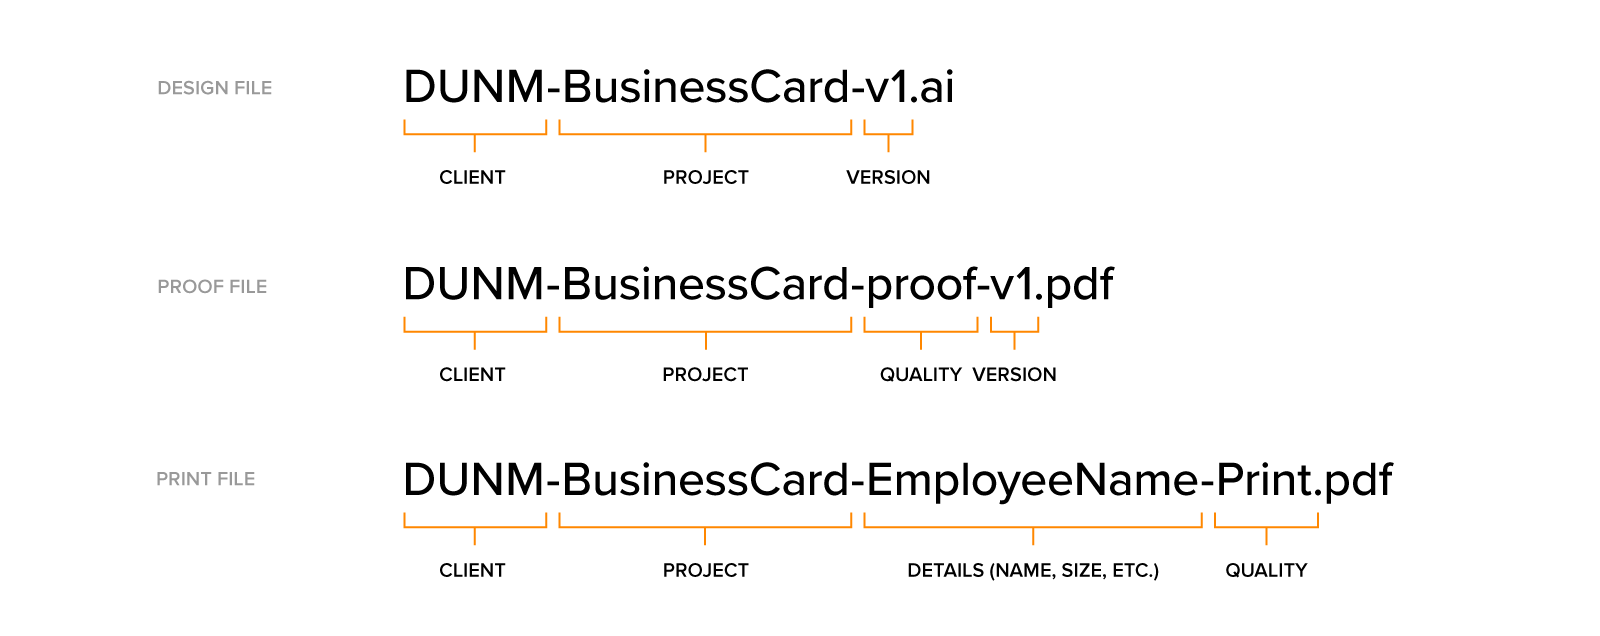
Next is the project name, followed by the latest version of your design. It’s best to avoid saving overtop of your original. Each time I make a significant change, I’ll create a new version. You never know if you’ll need to revert back to your original design so it’s best to keep older work.
But sometimes your client will change their mind and go back to a previous version to move forward with. To account for this, I always make sure my last version has the most recent approved changes. So if I have three versions and the client wants to make changes to version 2, I’ll make a copy and rename it as version 4. Why? Two reasons. First, it’s always best to keep all of your previous work in case you need to return to it. Second, if I’m returning to a project weeks later, I’ll always know that the latest version is the most up to date.
Use the Cloud
One last thing. We recommend you invest in a cloud service for managing your files. Working from a local drive is convenient, but it can also be risky. If your computer is stolen or dies out of nowhere, countless hours of client work could be lost and sensitive information can be accessed.
Using a cloud service like Google Drive or Microsoft SharePoint allows you to retrieve files from any computer and protects you from those unfortunate scenarios. If you work with a team, it’s easy to share and access shared files amongst everyone. You can even invite clients to shared folders as a way to collaborate during projects.
Taking that extra time to set your folder up at the start can feel like a drag. However, if you make it a habit you’ll make that time up quickly. To get you started, you can download my pre-made client folder structure:
